Embellish your holiday displays with a textural snowman made from balls of twine or string. Stack three different-size balls of twine on top of each other and hot-glue together. Hot-glue antique buttons down the front of the snowman and use pinheads for eyes. Add a fabric or ribbon scarf around his neck. For the hat, hot-glue a spool of black thread to the top.
***********************************************
Basics of Tea Dying
How to Tea Dye
Start with a clear plastic container or glass bowl so you can see the color of your tea. A darker tea will dye materials deeper shades, so try adding one tea bag at a time to hot water so you can settle on the color you want. Keep in mind that your finished material will dry a lighter color. When it comes to dying fabric or paper, the approach and results will differ:
* Paper: When dying paper, use thicker stocks that can tolerate moisture without falling apart. White construction paper works well since it’s fibrous, yet thicker in stock. If your tea is in a container that is too small for the paper, you can wrinkle it into a ball and let it soak to create patterns in the paper. Once your paper has dried, it will have a rustic, antique look.
* Fabric: If possible, use a scrap of the material you will be dying to test for your desired color. Light-colored fabrics will work best, but feel free to experiment. Keep in mind that tea dying is not a permanent dying method for materials that will be repeatedly washed. To dye your fabrics, follow three simple steps:
o Step 1: Rinse your fabric in water to even out the texture by loosening wrinkles and creases. For serious wrinkles, you may need to iron your fabric before this step, but if you’re trying to achieve a textured antique look, wrinkles can be beneficial for creating variations in the color of your fabric.
o Step 2: Once your fabric is damp, but not soaked, remove the tea bags from your tea solution, then dip the entire piece of fabric into the solution for even dying. Let it soak until you have achieved your desired color, using the scrap of material you sampled as a guide for timing. For a more uneven effect, you can dip parts of the material in before you completely submerge it.
o Step 3: Remove your fabric and let it dry. If it isn’t dark enough, you can repeat the following steps and leave your material in the solution longer for a darker effect.
Tips and Techniques for Dying
* Substitute with Coffee: For a darker dying effect, try using coffee as a substitute for tea. You can use the same basic tea dying method, but expect a different tone and color.
* Paint on ColorPaint on Color: Using your tea solution and a paintbrush, give the edges of books a worn appearance, create antique invitations or age labels. It’s a technique that’s great for adding that touch of old world feel, and it’s perfect for accenting spooky projects like the labels of Halloween potion bottles.
* Use Spray Bottles: Pour your tea into a spray bottle, then spray it on materials for a spattered effect. You can even spray materials you have already dyed to add another layer of color.
* Dab with Bags: Don’t let your tea bags go to waste! Put them to use by dabbing them on materials for a more subtle addition of color that will help create an uneven finish.
Tea dying is simple, affordable and something anyone can do. Whether you use the technique for a craft, or a subtle accent, give items character with a worn look.
***********************************************
Fabric Gift Bag

Materials
18x22" piece (fat quarter) print A (bag body)
18x22" piece (fat quarter) print B (lining, handles)
3/8 yard heavyweight, nonfusible interfacing
1"-diameter button
Cut the Fabrics
From print A, cut:
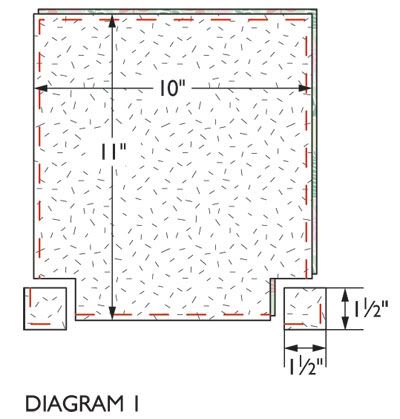
2 -- 10x11" bag body rectangles
1 -- 1-1/8x3" bias strip
From print B, cut:
2 -- 10x11" lining rectangles
2 -- 2-1/4x10" strips
From interfacing, cut:
2 -- 10x11" rectangles
From heavyweight cardboard, cut:
1 -- 2-3/4x5-3/4" rectangle
Assemble Bag
1. Baste interfacing rectangles to wrong side of bag body rectangles, machine-stitching a scant 1/4" from the edges. (Using the interfacing will give your gift bag more body and help it retain its shape.)
2. Cut a 1-1/2" square from each bottom corner of interfaced bag body rectangles (Diagram 1). Repeat to cut squares from bottom corners of lining rectangles.
3. Fold the A print 1-1/8x3" bias strip in half lengthwise; sew together long edges with 1/4" seam. Turn right side out and press; trim to 2-1/2" long. Fold in half to make a loop. With right sides together, center loop ends along top edge of bag body back rectangle; baste in place (Diagram 2).
4. Fold each print B 2-1/4x10" strip in half lengthwise and join long edges with 1/2" seam. Without trimming seams, turn tubes right side out to make handles; press. With right sides together, center ends of one handle along top edge of bag body back rectangle, 3-1/8" from outer edges; baste in place. Repeat to baste remaining handle to bag body front rectangle.
5. Join bag body rectangles along side and bottom edges to make bag body (Diagram 3). Press seams open.
6. To box bottom corners, match each side seam of bag body with the bottom seam; stitch across resulting straight edge (Diagram 4). Turn bag body right side out.
7. Repeat Step 5 with lining rectangles, leaving 4" opening along one side, to make lining.
8. Repeat Step 6 to box bottom corners of lining. Do not turn lining right side out.
9. Insert bag body into lining (they will be right sides together). Sew together around top edge
10. Turn bag body and lining to right side through opening in lining side seam. Hand-stitch opening closed. Push lining down into bag body and press upper edge of bag. Topstitch 1/4" from bag upper edge through all layers.
11. Press creases into bag sides to resemble a lunch sack. Insert cardboard rectangle into bag to reinforce bag bottom. Hand-stitch button to front of bag to hold loop in place.
**********************************************************

This cute little spider candy holder hangs on a doorknob just waiting to give you treats.
What you'll need:
* 9" paper plate
* 4 black chenille stems
* Three 36"-long pieces of green yarn
* Black, white and light green acrylic paint
* 3" x 5" piece of orange construction paper
* Black marker
* White craft glue
* Scissors
How to make it:
1. Fold paper plate in half and make a crease.
2. Cut paper plate in half using crease as a guide.
3. Turn paper plate pieces upside down (rounded side up). Paint both halves of plate with black paint and let dry (see image).
4. When dry, glue along the rounded edges of the two pieces of plate and stick the plates together, unpainted sides should be facing each other. Do not glue the cut sides; this is the opening of your plate pocket.
5. Cut chenille stems in half.
6. Set aside two of the chenille stems. Bend the ends of the remaining chenille stems, about 1" at each end. Bend one to the left and the other to the right (see image).
7. For the remaining two chenille stems, bend one end about 1" and the other end about 2".
8. Place plate pocket in front of you, with the open end at the top. Glue three chenille legs on the left (glue to the under side) and the other three on the right.
9. Take the remaining two stems and glue the 2" bend under the plate about 1/3 of the way down from the left, and 1/3 of the way down on the right. Allow to dry.
10. Make eyes from white construction paper, or paint a section of any color construction paper with white paint. When dry, cut out two circles, about 1.5" in diameter. Use the handle end of a paint brush to add the black pupils. When black is dry, use a toothpick or small paint brush handle to dot a small bit of white onto the black pupil. When eyes are completely dry, glue them to the front of the plate.
11. Paint a wiggly smile on the front of the plate using green paint (see image).
12. Write "Happy Halloween!" on the orange construction paper with black marker. Glue the paper underneath the spider’s "hands" so that it appears that it is holding the sign (see image).
13. To make the handle, line all three pieces of yarn up together and tie one end in a knot. Braid the strands together and knot at the other end.
14. Open the pocket and pipe some glue into the creases then press the ends of the yarn handle inside and let dry (see image).
15. Fill with candy or other treats and hang.
Tips:
1. Instead of making the eyes you can use large wiggle eyes.
2. If you prefer to skip braiding the yarn, you can cut a handle from craft foam.
3. Chenille stems are available at your local discount department store or craft store. Watch for sales following each holiday as you can pick up theme colors on clearance (green and red – Christmas, etc).
**************************************************************
How to Make Bookends From Classical LP Vinyl Record Albums

Find 2 LP vinyl record albums!
Boil water to pour into the sink or use large pan (deep and wide enough so that the record will fit when dipping). You will need at least 4" of water. I found that my turkey pan was just the perfect size and depth to work well, so I was able to heat the water right on the stove and dip there as well.

Dip the LP into the hot water up to the bottom of the label, making sure that the outside label is straight. Start pushing down gently, bending the album as it softens. This only takes a few seconds.

Using a wooden spoon or other utensil, flatten the edges that are in the water as they start to ripple.
Remove the record from the hot water (it will be formed in a curved right angle shape). Continue to flatten and work with the bent part on the counter to smooth and hold its shape as it cools off. This happens very quickly. If you did not get the flattened part nice and smooth, it can be dipped back into the hot water and re-shaped if needed.
Repeat above steps for the second LP Vinyl.
Use the self-stick clear rubber tips on the bottoms, as shown in the picture. This will not only protect your furniture, but also gives them a bit of a grip to stay in place.
Find a special spot to display them on either side of of your favorite books.